Win at Filtering Email Sent to an Alias in Microsoft 365!
 Welcome! Frequently, we are asked about filtering emails sent to an alias on a user’s account in Microsoft 365. What is an alias, you may ask? Great question! An alias is, just as it sounds, another email address or “nickname” assigned to your primary mailbox. For instance, your name is Joe Smith, and your primary email address is [email protected]. However, given that we all wear many hats when it comes to our businesses, you might also handle marketing. Wouldn’t it be nice to hand out an email address like [email protected] to vendors or clients instead of your personal email address? But wait! No one wants to check an additional mailbox! Here comes the power of an alias! We can simply assign [email protected] as an alias on your account. Problem solved! Well, not really.
This all sounds great, but now our inbox is going to be flooded with emails sent to you and also the new alias. Maybe you have had an employee leave and don’t want to miss an email sent to that old employee. We can add them as an additional aliases. Maybe you handle more roles in your business—yup, another alias. It is not uncommon for folks to have three or four aliases depending on their business. Wouldn’t it be nice to set up some folders and filter those messages for some sanity?! Read on …
First, let’s hop into Outlook Web Mail using your favorite web browser. Simply browse to https://outlook.office.com/mail/ – if you are not automatically logged in, go ahead and enter your credentials.
Next, create a folder or two under your INBOX (or another location) to send the newly filtered email to. For instance, create a folder called “ALIAS: [email protected]” under your INBOX.
Now, let’s get into the fun part. Creating the rule! Click on the gear or cog wheel in the upper right, then go down to “View all Outlook settings.”
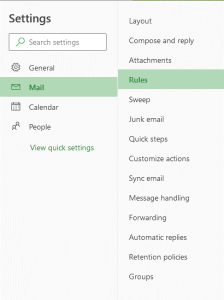
Once in Outlook Web Mail settings, click Mail > Rules > Add new rule

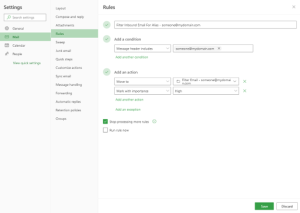
We can now craft our new rule based on the image below.

The first field of the rule for our alias should be a simple and friendly name to identify the rule. For instance, “Filter Inbound Email Sent To: [email protected]”
We then need to add a condition so Microsoft knows what we are trying to do with this rule. We want to look in the message header for the alias assigned to our account. Next, we need to tell Microsoft what we want to do with this message(s). The easiest is to just move the message into a new folder, but you can also create additional actions on the message. For instance, mark it as of high importance. At first, we recommend just moving the message to a specific folder. You can always adjust the rule later on!
Finally, click the Save button in the lower right. DONE! Pretty slick, huh? Getting stuck, or just need help?!


